Installing Arch on an Encrypted Hard Drive

I got a new laptop last week and I thought I'd try out Arch since I've been getting a little bored with the Debian universe lately. My old laptop had CrunchBang on it, which was fun to play around with and very fast but I thought I'd challenge myself and try something that wasn't based on Debian.
Installing Arch is a little more involved than installing Ubuntu or CrunchBang because it has no graphical installer and expects you to set everything up manually, which I love. It's also a rolling release, which means that there are no specific releases like with Ubuntu or RedHat, but that new and updated packages are constantly made available to users. This means that Arch usually has the newest versions of all the software in the repository, which is something I really like. For example, Arch just updated their repos to kernel 3.13.5 yesterday — the day after that version was released on kernel.org. Debian Wheezy, the newest stable release, is still on kernel 3.2 and even Sid, their unstable branch, is on 3.9. This is not to mention the amazing Arch User Repository, which so far has let me install everything from a GameBoy Advance emulator to drivers for my Chinese TV tuner that I use as a software-defined radio.
Despite the lack of a graphical installer, setting up an Arch machine is usually pretty straightforward. There's not a whole lot to configure to get to a minimum workable system, and installing a DE on top of that is only a couple of extra steps. However, I always encrypt my laptop hard drive, which makes the installation process a little trickier. I probably spent two hours or so reading forums and man pages to work out all the problems I ran into setting this up because it's not documented that well on the wiki. This is what I did to get it working.
Why Bother with Encryption?
The obvious solution (which I considered several times while trying to make everything play nice) is to abandon full disk encryption. This would certainly solve the problem, but I think the value of encrypting my hard drive is worth the trouble of setting it up. There are really two main reasons why I encrypt:
- People have access to my computer when I'm not around and I don't want them messing with it.
- If my laptop gets stolen, I'd rather have it wiped than have my identity stolen along with it.
I like to think that encrypting your computer's hard drive is like locking your front door; I don't expect anybody to break in, but it's easy to make sure they don't. I certainly don't encrypt my hard drive to keep out THE GUBMINT; they can (in most countries — mine included) compel me to turn over the encryption keys if they want them. One of my favorite xkcd comics sums up the government surveillance argument pretty well:

The Process
This explanation closely follows the Arch Installation Guide on the wiki. I suggest reading it before installing Arch as it covers a lot of situations that I don't.
Partitioning the Disk
After downloading an ISO and booting it in the target computer, the first step is to partition the disk. There are many, many ways you could do this, but I'm going to use LVM because it makes it trivial to add, remove, or resize partitions later if I want to. This disk is going to have three partitions:
- /dev/sda1 - 1 MiB for BIOS compatibility
- /dev/sda2 - 100 to 200 MiB for /boot
- /dev/sda3 - The rest of the disk — this is where my LVM volumes will go
Open cgdisk and create three new partitions. The 1 MiB partition at the beginning should have type ef02, the /boot partition should be type 8300, and the LVM partition should have type 8e00. Here's what it should look like when you're done:
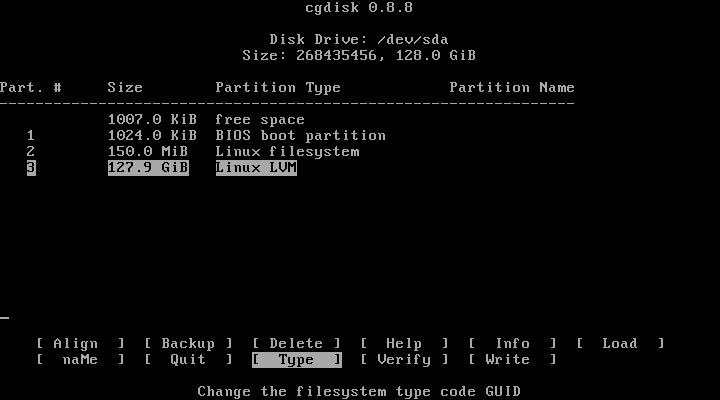
If everything looks good, hit write to write the partition table to disk.
Before creating the encrypted FS, format /boot like this:
mkfs.ext2 /dev/sda2
/dev/sda1 doesn't need to be formatted, so don't.
Creating the Encrypted Filesystem
I used LUKS to encrypt my system partition since it's included in the kernel and relatively easy to set up, so that's what I'll cover here. You could use TrueCrypt or something else if you want, but LUKS has the same features and is (in my opinion at least) easier to use on Linux.
To create an encrypted partition, we use cryptsetup, which has a TON of options. We're setting up a new partition, so we use the luksFormat action. The default encryption options are secure enough, but if you want to you can change the cipher and the keysize. I decided I wanted a larger key than the default 256 bits, so I specified a 512-bit key with -s 512. Here's the command I used to format the LUKS partition:
cryptsetup luksFormat -s 512 /dev/sda3
You'll be prompted for a password — make sure to choose a good one — and kicked back to the command line when it's done formatting, like this:
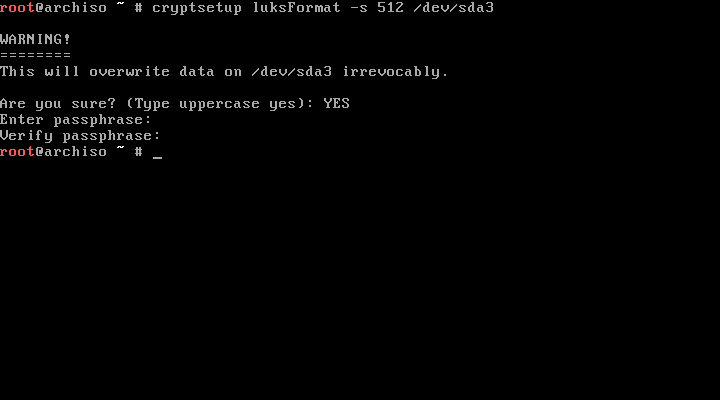
In order to use our fancy new encrypted partition, we'll have to mount it. Cryptsetup lets us do that with the luksOpen action:
cryptsetup luksOpen /dev/sda3 luks
This mounts /dev/sda3 on /dev/mapper/luks. You can change luks to whatever you want; the computer doesn't care.
Setting up the LVM Volume
Image by Emanuel Duss via Wikimedia Commons [CC-BY-SA-3.0]
An LVM volume has three levels: the physical medium that the volume will sit on — in our case an encrypted partition, but these can be groups of partitions that span several disks; the volume group that contains all of our volumes — these can also span multiple physical disks and can contain multiple LVM physical volumes; and the logical volumes themselves — these correspond to the actual partitions we'll mount at boot time.
You can see that LVM abstracts the actual physical medium completely away from the partition layout it uses, which is great for systems with a lot of hard drives, but I like it because it lets me change my mind about how to partition the disk without wiping out all of my data. I threw everything into one big partition for now, but if I decide I want a swap partition or a separate /home partition in the future, LVM makes it easy to add those.
The first step in setting up LVM is to create the physical volume. We just want to use our encrypted partition, so that's what we tell pvcreate.
pvcreate /dev/mapper/luks
We don't want to use /dev/sda3; that would overwrite the encrypted partition already there. Next we create a volume group. I'm calling mine vg0, but you can be as creative as you want.
vgcreate vg0 /dev/mapper/luks
Now, to make sure we fill the entire volume group with a single volume, we need to look at the output of vgdisplay to see how many blocks are available (this is the number on the "Free PE" line). We'll then use this number with lvcreate to get a volume that's the right size. This is the command I used to create a volume called "root" — again, be as creative as you please with the names:
lvcreate -l 32729 /dev/mapper/vg0 -n root
Here's the terminal output of the volume creation process:
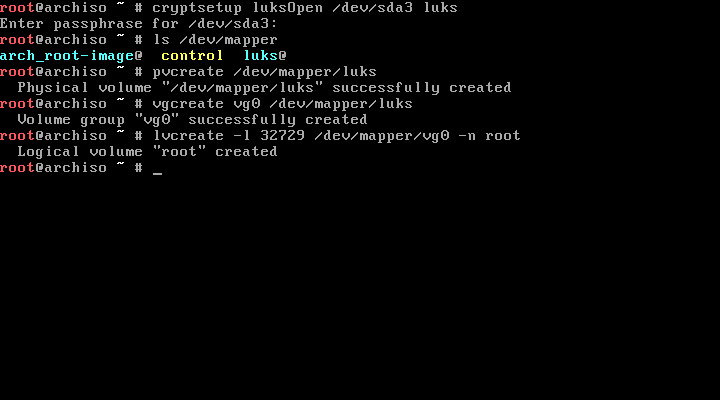
Now we're ready to format our root volume. I'm using ext4 because it's stable and well-supported, so use the corresponding mkfs command for your filesystem of choice. Note that the volume is mounted at /dev/mapper/vg0-root, not /dev/mapper/luks, which is our encrypted partition. If you used different names, your volume will be located at /dev/mapper/[volume group]-[volume].
mkfs.ext4 /dev/mapper/vg0-root
Installing Arch
Now for the easy part. Installing Arch requires us to mount the partitions we just set up, so let's:
mount /dev/mapper/vg0-root /mnt

mkdir /mnt/boot

mount /dev/sda2 /mnt/boot
The next few parts come straight out of the Installation Guide, so have a look at that if you're fuzzy on any details.
We need to use pacstrap to install the base Arch packages. I also like to use vim, so I'll be installing that now as well. You can install any packages you want at this stage, but I prefer to keep the list small to save time. You'll need internet access for this part, so make sure to set that up first. I used a wired connection, so I didn't need to set anything up on my machine. Assuming the drivers are loaded for your wireless card, you can use wifi-menu to connect to a wireless network.
pacstrap /mnt base vim
The Arch installation disc is kind enough to provide software to generate an fstab for us, so let's use that. Once that's done, we can chroot into our new installation and finish configuring it from there. I'm going to use bash instead of sh, but if you don't care you can leave that off the end of the chroot command.
genfstab -p /mnt >> /mnt/etc/fstab

arch-chroot /mnt /bin/bash
Now we need to set up the hostname, the timezone settings, and the locale. I'm in Michigan, so America/Detroit is my timezone and I used en_US.UTF-8 as my locale. Find your preferred locale in /etc/locale.gen and uncomment it before running locale-gen.
vim /etc/hostname

ln -s /usr/share/zoneinfo/America/Detroit /etc/localtime

vim /etc/locale.gen

locale-gen

vim /etc/locale.conf
Inside /etc/locale.conf, just put the locale you selected in /etc/locale.gen. Here's mine:
LANG=en_us.UTF-8
Now for something important: mkinitcpio.conf. This file tells mkinitcpio which modules to include in the initramfs that we boot to before decrypting the rest of the drive. We need to include the module encrypt to be able to use our encrypted partition and lvm2 to access the LVM group that contains our root directory. We add these two modules to the HOOKS= line in /etc/mkinitcpio.conf between block and filesystems — the order really does matter:
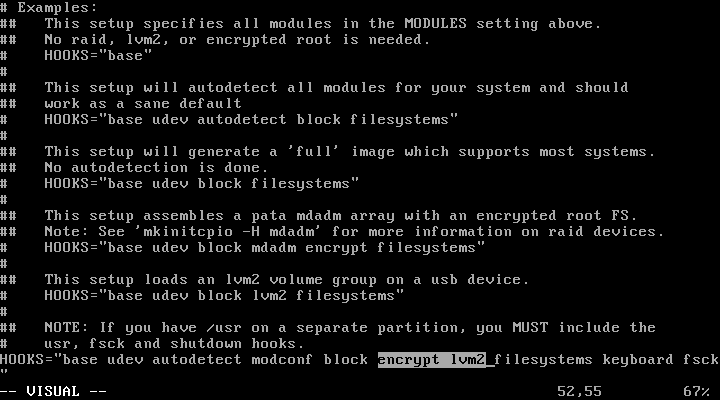
Now run mkinitcpio to rebuild the initramfs:
mkinitcpio -p linux
Installing the Bootloader
That's the OS configured, but we still don't have a bootloader. Arch doesn't install one by default; that decision is left up to the user. I'm partial to GRUB, so that's what I'll show you how to configure.
First we have to install the GRUB package:
pacman -S grub
Now we need to change a few settings in /etc/default/grub so we can boot to our encrypted LVM volumes. Make sure you have these two lines at the top of the file:
GRUB_CMDLINE_LINUX="cryptdevice=/dev/sda3:luks"

GRUB_DISABLE_LINUX_UUID=true
The first line makes sure that our encrypted partition (/dev/sda3) is decrypted and mounted at /dev/mapper/luks. Again, use whatever label (in this case luks) you want; I just chose the first thing I thought of. Note that this doesn't have to be the same as the label you used when mounting the drive with cryptsetup; you can use something completely different if you want.
The second line prevents GRUB from passing root=UUID=blah to the kernel, since our partition's UUID is unknown until the device is decrypted.
Now we install GRUB to the disk and create /boot/grub/grub.cfg:
grub-install /dev/sda

grub-mkconfig -o /boot/grub/grub.cfg
Reboot
If all goes well, we're ready to boot our new Arch installation. Exit the chroot session and unmount the drive before rebooting:
exit

umount -R /mnt

reboot
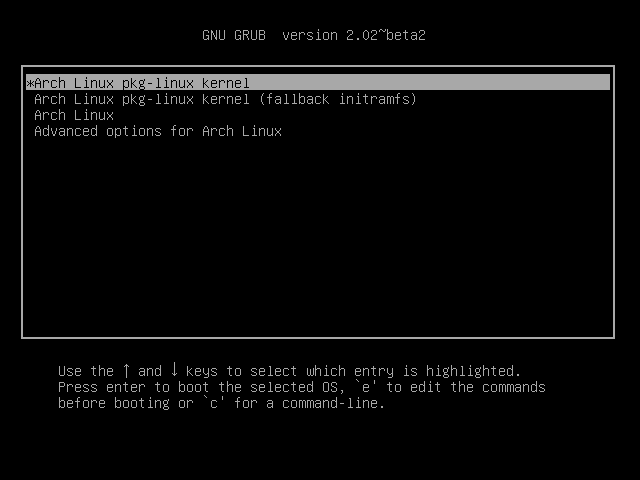
First the boot menu…
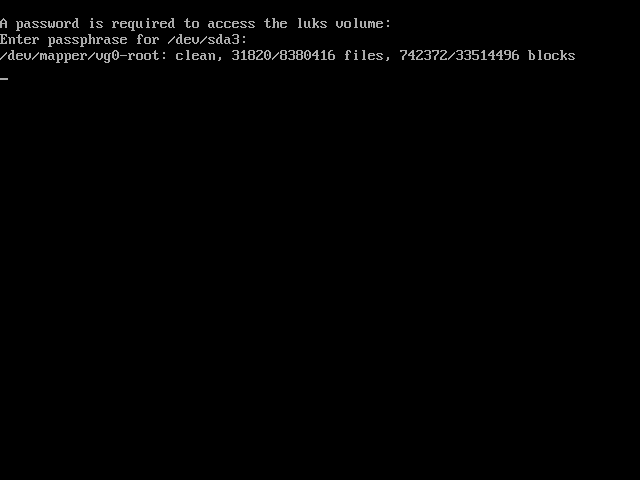
Then we decrypt the drive…
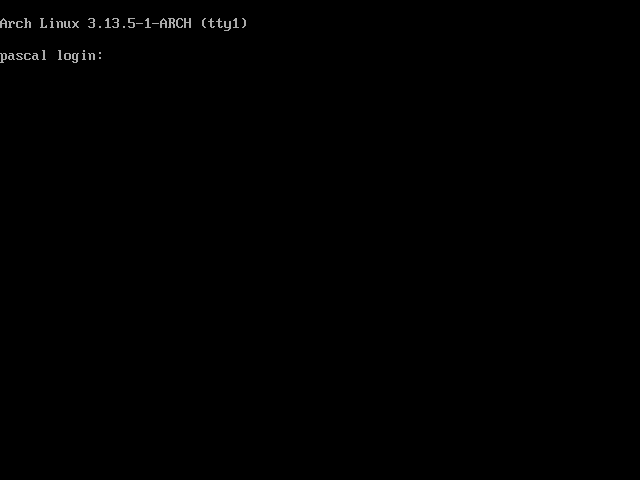
Success!
Conclusion
I wrote this guide mostly to help myself in case I need to install Arch again, but hopefully it helped you too. I will probably write up the rest of my Arch config at some point in the not-too-distant future, but this is enough to get a system to the point where you can start customizing it, so everything after this point is likely differ significantly between users.